วันเสาร์ที่ 16 กรกฎาคม พ.ศ. 2559

การใช้ Spring Boot บน Websphere 8, 8.5

เพราะว่าเป็น Enterprise เลยต้องมีเวลา Customize เพิ่มครับ

1. ต้อง Downgrade ให้ไปใช้ JPA2.0 แทนเพราะ Spring Boot ใช้ JPA2.1 (JPA จะโหลดจาก Application Server ไม่สามารถ Config ให้โหลดจาก Web  Project ได้ครับ) ทีนี่

2. Spring Boot จะ config แบบ no web.xml โดยการ extend SpringInitializer ถ้า Websphere ไม่สามารถโหลดได้ต้องเปลี่ยน Config ให้ใช้ web.xml ครับ แล้วอะไรที่ Config บน web.xml ต้องย้ายมาหมดพวก filter, ดัก error-page ที่นี่

3. สำหรับคนที่จะ Config Maven ให้ RAD ใช้งานได้ ดู ที่นี่

การ Config SpringBoot ให้ใช้งานแบบมี web.xml

การ Config แบบนี้จะต้องย้ายพวก filter ออกมาจาก annotation แล้วมา config บน web.xml ให้หมดด้วยครับ ไม่งั้นจะใช้งานไม่ได้ ใน web.xml ผมมีตัวอย่างของการ Config CXF ด้วย ว่าต้องย้ายมาไว้บน web.xml ด้วยไม่งั้นใช้งานไม่ได้
<context-param>
 <param-name>contextConfigLocation</param-name>
 <param-value>xxx.Application</param-value>
</context-param>

<listener>
 <listener-class>org.springframework.boot.legacy.context.web.SpringBootContextLoaderListener</listener-class>
</listener>

<servlet>
 <servlet-name>spring</servlet-name>
 <servlet-class>org.springframework.web.servlet.DispatcherServlet</servlet-class>
 <init-param>
  <param-name>contextAttribute</param-name>
  <param-value>org.springframework.web.context.WebApplicationContext.ROOT
  </param-value>
 </init-param>
 <load-on-startup>1</load-on-startup>
</servlet>

<!-- Servlet Mapping for CXFServlet -->
<servlet>
 <servlet-name>CXFServlet</servlet-name>
 <servlet-class>org.apache.cxf.transport.servlet.CXFServlet</servlet-class>
</servlet>

<servlet-mapping>
 <servlet-name>CXFServlet</servlet-name>
 <url-pattern>/soap-api/*</url-pattern>
</servlet-mapping>

<servlet-mapping>
 <servlet-name>spring</servlet-name>
 <url-pattern>/*</url-pattern>
</servlet-mapping>
- จะเห็นว่าใช้ org.springframework.boot.legacy.context.web.SpringBootContextLoaderListener ตัวนี้แทนของเดิม
- contextConfigLocation เพื่อไปอ่าน Class ที่ Config ของ  SpringBoot เหมือนกับที่ต้อง config บน start-class ที่ใช้บน maven เพื่อให้มันทำานได้

วิธี Downgrade JPA จาก 2.1 เป็น 2.0 ของ SpringBoot

1. เริ่มจากเอา Config  JPA ออกจาก SpringBoot ก่อนครับ โดยใช้ exclusion org.hibernate
<dependency>
 <groupId>org.springframework.boot</groupId>
 <artifactId>spring-boot-starter-data-jpa</artifactId>
 <exclusions>
  <exclusion>  
   <groupId>org.hibernate</groupId>
  </exclusion>
 </exclusions>
</dependency>
2.ต่อไปก็เพิ่ม JPA 2.0 เข้าไป ถ้าใช้บน Websphere อาจจะต้องเอา javax.persistence ออกด้วยครับ ถ้ายังมี error อยู่
<dependency>
 <groupId>org.hibernate</groupId>
 <artifactId>hibernate-core</artifactId>
 <version>${hibernate.version}</version>
 <scope>compile</scope>
 <exclusions>
  <exclusion>
   <groupId>org.hibernate.javax.persistence</groupId>
   <artifactId>hibernate-jpa-2.0-api</artifactId>
  </exclusion>
 </exclusions>
</dependency>
<dependency>
 <groupId>org.hibernate</groupId>
 <artifactId>hibernate-entitymanager</artifactId>
 <version>${hibernate.version}</version>
 <scope>compile</scope>
 <exclusions>
  <exclusion>
   <groupId>org.hibernate.javax.persistence</groupId>
   <artifactId>hibernate-jpa-2.0-api</artifactId>
  </exclusion>
 </exclusions>
</dependency>
3. ต่อไปต้องเพิ่ม Code การโหลด entityManagerFacorry มาใหม่
 @Bean(name = "entityManagerFactory")
    public LocalContainerEntityManagerFactoryBean getEntityManagerFactory() {
     
     LocalContainerEntityManagerFactoryBean entityManagerFactory = new LocalContainerEntityManagerFactoryBean();
     entityManagerFactory.setDataSource(dataSource);
     entityManagerFactory.setPackagesToScan("xxx.entities");
     entityManagerFactory.setJpaVendorAdapter(getJPAVendor());
     entityManagerFactory.setJpaProperties(getHibernateProperties());
     
     return entityManagerFactory;
    }


    @Bean
    public LocalSessionFactoryBean sessionFactory() throws IOException {
     logger.debug("sessionFactory()");
     
        LocalSessionFactoryBean factoryBean = new LocalSessionFactoryBean();
        factoryBean.setHibernateProperties(getHibernateProperties());
        factoryBean.setDataSource(dataSource);
        factoryBean.setPackagesToScan("xxx.entities");
        
        return factoryBean;
    }


    @Bean
    public PersistenceExceptionTranslationPostProcessor exceptionTranslation() {
        return new PersistenceExceptionTranslationPostProcessor();
    }
    
    
    private JpaVendorAdapter getJPAVendor() {
     
     HibernateJpaVendorAdapter hibernateJpaVendorAdaptor = new HibernateJpaVendorAdapter();
     hibernateJpaVendorAdaptor.setShowSql(true);
     
     return hibernateJpaVendorAdaptor;
    }
    
    
    private Properties getHibernateProperties() {
        Properties properties = new Properties();
        
            // This is to get around a Websphere Bug
        properties.put("hibernate.dialect", Oracle10gDialect.class.getName());
        properties.put("hibernate.show_sql", "true");
        
        logger.debug("properties : {}", properties);
        return properties;
    }

วันอังคารที่ 7 กรกฎาคม พ.ศ. 2558

ทำให้ Spring Boot Reload บน Eclipse

ปกติเราจะรันผ่าน Command line โดยใช้ Maven รัน มาตอนนี้ลองรันผ่าน Eclipse กันบ้าง (ตัวอ่นก็ใช้ได้นะครับ)
1. จะรันเหมือน Java Class ปกติ ครับ โดยสั่งให้ไปรันที่ Class ที่เราไว้ Start Spring Boot นั่นเอง (Run As..)

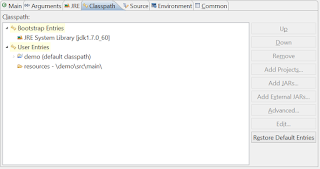
2. เผอิญ Eclipseไม่ฉลาดเลยจะไม่เห็นส่วนของ src/main/resources เราจะต้องแอดไปเองในส่วนของ Class Path
3. ต่อไปก็สั่งรันได้แล้วครับ

เพิ่มเติมสำหรับคนอยา่ให้มัน Reladed อัติโนมัตหลังแก้ ให้เพิ่ส่วนของ Spring Loaded ไปตามนี้ครับ
เพิ่มส่วนของ Argument
-javaagent:springloaded-1.2.3.RELEASE.jar -noverify


วันจันทร์ที่ 29 มิถุนายน พ.ศ. 2558

Spring Boot ตอนที่ 9 มาสร้าง Banner กัน

มาสร้าง Banner ลงบน Application ตอนเรา Start กันครับ
มันคือส่วนนี้


เราสามารถเปลี่ยนง่ายโดยการเพิ่ม banner.txt ไว้ที่ src/main/resources ครับ ก็จะได้ใช้ได้เลย
สามารถใช้เวบนี้ สร้างภาพได้ http://patorjk.com/software/taag/#p=display&f=Graffiti&t=Demo%20Spring%20Boot

ส่วนสามารถปิดเปิด Banner ได้โดยการเพิ่มค่าใน application.properties

spring.main.show-banner=true
 

วันเสาร์ที่ 20 มิถุนายน พ.ศ. 2558

Spring Boot ตอนที่ 8 Testing

ต่อไปมาดูว่าเราจะเทสกันยังไงครับ ถ้าเป็น Unit Testing ไม่ใช่ส่วนของ Controller กับ Repository น่าจะเเขียนเทสได้เลยโดยไม่ต้องพึ่ง Spring-Test สกับพวก Integration Testing ก็ต้องใช้ Spring-Test ล่ะครับ
เรามาดูกัน
1. Config POM
 <dependency>  
      <groupId>org.springframework.boot</groupId>  
      <artifactId>spring-boot-starter-test</artifactId>  
      <scope>test</scope>  
 </dependency>  
     โดยมันจะดึง Library Spring Test, JUnit, Hamcrest, Mockito มาให้เลยครับ

2. ถาจะทำเทสจะต้องมี embedded server มาด้วยนะครับ เพราะถ้าเขียนลง Server จะ exclude ออก ถ้าจะเทสจะเอาเข้ามาแล้วใช้ Scope = test เอาครับ แบบนี้
 <dependency>  
      <groupId>org.springframework.boot</groupId>  
      <artifactId>spring-boot-starter-tomcat</artifactId>  
      <scope>provided</scope>  
 </dependency>  

3. มาดู Class Test
 package tutorialspring4.controllers;  
 import static org.hamcrest.Matchers.is;  
 import static org.springframework.test.web.servlet.result.MockMvcResultMatchers.jsonPath;  
 import static org.springframework.test.web.servlet.result.MockMvcResultMatchers.status;  
 import org.junit.Before;  
 import org.junit.Ignore;  
 import org.junit.Test;  
 import org.junit.runner.RunWith;  
 import org.springframework.boot.test.SpringApplicationConfiguration;  
 import org.springframework.http.MediaType;  
 import org.springframework.mock.web.MockServletContext;  
 import org.springframework.test.context.junit4.SpringJUnit4ClassRunner;  
 import org.springframework.test.context.web.WebAppConfiguration;  
 import org.springframework.test.web.servlet.MockMvc;  
 import org.springframework.test.web.servlet.request.MockMvcRequestBuilders;  
 import org.springframework.test.web.servlet.setup.MockMvcBuilders;  
 import tutorial.spring4.controllers.HelloController;  
 import tutorial.spring4.forms.HelloForm;  
 @RunWith(SpringJUnit4ClassRunner.class)  
 @SpringApplicationConfiguration(classes = MockServletContext.class)  
 @WebAppConfiguration  
 public class HelloControllerTest {  
      private MockMvc mvc;  
      @Before  
      public void setUp() throws Exception {  
           mvc = MockMvcBuilders.standaloneSetup(new HelloController()).build();  
      }  
      @Test  
      public void getHello() throws Exception {  
           HelloForm form = new HelloForm();  
           form.setSay("Hi");  
           form.setName("Hello");  
           mvc.perform(MockMvcRequestBuilders.get("/hello").accept(MediaType.APPLICATION_JSON)).andExpect(status().isOk())  
           .andExpect(jsonPath("$.say", is(form.getSay()))).andExpect(jsonPath("$.name", is(form.getName())));  
      }  
 }  
     - RunWith = SpringJUnit4ClassRunner บอก JUnit ว่าจะใช้ Spring Test
     - SpringApplicationConfiguration = MockServletContext บอก Spring ว่าจะใช้ Mock ส่วนของ servlet
     - MockMvc จะ Mock ส่วนของ Controller เพื่อเทส จะเห็นว่าตอน SetUp จะมีการ Build อยู่
     - ส่วนเทสจะเห็นว่าเทสไปที่ Path เลยไม่ได้เทส จาก Controller ทำให้เทส route ว่าถูกไหม ทำงานโอเคไหมครับ

References
Basic
1. Spring Boot ตอนที่ 1 มาทำความรู้จักกับ Spring Boot
2. Spring Boot ตอนที่ 2 Hello World
3. Spring Boot ตอนที่ 3 โครงสร้างของ Project
4. Spring Boot ตอนที่ 4 Spring Boot กับ Thymeleaf
5.Spring Boot ตอนที่ 5 Spring Boot กับ Database [แบบ Embeded]
6.Spring Boot ตอนที่ 6 กับ Production Database
7.Spring Boot ตอนที่ 7 Security
8.Spring Boot ตอนที่ 8 Testing

วันศุกร์ที่ 19 มิถุนายน พ.ศ. 2558

Spring Boot ตอนที่ 7 Security

Spring Boot ก็ใช้ Spring Security ครับ ซึ่งก็ทำง่ายมาก แต่หันมาใช้การ Config ผ่าน Annotation และก็เขียนคลาสหมดไม่ได้ใช้ XML แล้วครับ ซึ่งอาจจะดูแปลกตาสำหรับคนที่ใช้ XML พอสมควร งั้นมาเริ่มกันเลย
1. Config POM เพิ่ม
 <dependency>  
         <groupId>org.springframework.boot</groupId>  
         <artifactId>spring-boot-starter-security</artifactId>  
</dependency>  

2. ต่อไปก็ EnableWebSecurity
 package tutorial.spring4;  
 import javax.annotation.Resource;  
 import org.springframework.beans.factory.annotation.Autowired;  
 import org.springframework.context.annotation.Configuration;  
 import org.springframework.security.authentication.encoding.PlaintextPasswordEncoder;  
 import org.springframework.security.config.annotation.authentication.builders.AuthenticationManagerBuilder;  
 import org.springframework.security.config.annotation.web.builders.HttpSecurity;  
 import org.springframework.security.config.annotation.web.configuration.WebSecurityConfigurerAdapter;  
 import org.springframework.security.config.annotation.web.servlet.configuration.EnableWebMvcSecurity;  
 import org.springframework.security.core.userdetails.UserDetailsService;  
 import org.springframework.security.crypto.bcrypt.BCryptPasswordEncoder;  
 import org.springframework.security.crypto.password.NoOpPasswordEncoder; 
 
 @Configuration  
 @EnableWebMvcSecurity  
 public class WebSecurityConfig extends WebSecurityConfigurerAdapter {  
      @Resource(name="basicUserDetailService")  
      private UserDetailsService userDetailsService;  
      @Override  
      protected void configure(HttpSecurity http) throws Exception {  
           http.authorizeRequests().antMatchers("/hello").permitAll().anyRequest().authenticated().and()  
                     .formLogin().loginPage("/login").failureUrl("/login?error").defaultSuccessUrl("/loginresult", true).permitAll()  
                     .and().logout().permitAll();  
      }  
      @Override  
      protected void configure(AuthenticationManagerBuilder auth) throws Exception {  
           auth.userDetailsService(userDetailsService).passwordEncoder(new PlaintextPasswordEncoder());  
      }  
 }  
     แบบนี้เป็น Config ให้ใช้ UserDetailService ที่คุ้นเคย โดยเราจะเห็นว่า Class นี้เป็น Config และบอกให้ Enable Web Security ด้วย และ extends WebSecurityConfigurerAdapter มีสองตัวหลักๆ
     - Method แรก สำหรับที่เรา Config Route ที่เคยเห็นๆ บน XML อันนี้ยกมาบน Class สำหรับผ่านง่ายขึ้น อธิบายคร่าวๆ
          - antmatches คือตรงกับอันนี้ จะทำอะไรอ่านข้างหลัง permitAll คือเข้าได้หมด อันอื่นๆ anyRequest ต้องมี Authen พอทำเสร็จ
          - ส่วนของหน้า Login ใช้ formLogin ด้วยหน้าอะไร ถ้า fail ไปไหน สามารถกำหนดได้ว่า ถ้า login ให้กลับไปหน้าเก่าที่เราเข้ามาได้ด้วยนะครับ
     - Method ที่สอง หลักๆ ไว้สำหรับเรื่องว่าจะ authen แบบไหนมี่ทั้ง JDBC/LDAP/ InMemory

3. แค่นี้ก็เป็นอันเสร็จเรียบร้อยแล้วครับ

References
Basic
1. Spring Boot ตอนที่ 1 มาทำความรู้จักกับ Spring Boot
2. Spring Boot ตอนที่ 2 Hello World
3. Spring Boot ตอนที่ 3 โครงสร้างของ Project
4. Spring Boot ตอนที่ 4 Spring Boot กับ Thymeleaf
5.Spring Boot ตอนที่ 5 Spring Boot กับ Database [แบบ Embeded]
6.Spring Boot ตอนที่ 6 กับ Production Database
7.Spring Boot ตอนที่ 7 Security
8.Spring Boot ตอนที่ 8 Testing