วันเสาร์ที่ 16 กรกฎาคม พ.ศ. 2559

การใช้ Spring Boot บน Websphere 8, 8.5

เพราะว่าเป็น Enterprise เลยต้องมีเวลา Customize เพิ่มครับ

1. ต้อง Downgrade ให้ไปใช้ JPA2.0 แทนเพราะ Spring Boot ใช้ JPA2.1 (JPA จะโหลดจาก Application Server ไม่สามารถ Config ให้โหลดจาก Web  Project ได้ครับ) ทีนี่

2. Spring Boot จะ config แบบ no web.xml โดยการ extend SpringInitializer ถ้า Websphere ไม่สามารถโหลดได้ต้องเปลี่ยน Config ให้ใช้ web.xml ครับ แล้วอะไรที่ Config บน web.xml ต้องย้ายมาหมดพวก filter, ดัก error-page ที่นี่

3. สำหรับคนที่จะ Config Maven ให้ RAD ใช้งานได้ ดู ที่นี่

การ Config SpringBoot ให้ใช้งานแบบมี web.xml

การ Config แบบนี้จะต้องย้ายพวก filter ออกมาจาก annotation แล้วมา config บน web.xml ให้หมดด้วยครับ ไม่งั้นจะใช้งานไม่ได้ ใน web.xml ผมมีตัวอย่างของการ Config CXF ด้วย ว่าต้องย้ายมาไว้บน web.xml ด้วยไม่งั้นใช้งานไม่ได้
<context-param>
 <param-name>contextConfigLocation</param-name>
 <param-value>xxx.Application</param-value>
</context-param>

<listener>
 <listener-class>org.springframework.boot.legacy.context.web.SpringBootContextLoaderListener</listener-class>
</listener>

<servlet>
 <servlet-name>spring</servlet-name>
 <servlet-class>org.springframework.web.servlet.DispatcherServlet</servlet-class>
 <init-param>
  <param-name>contextAttribute</param-name>
  <param-value>org.springframework.web.context.WebApplicationContext.ROOT
  </param-value>
 </init-param>
 <load-on-startup>1</load-on-startup>
</servlet>

<!-- Servlet Mapping for CXFServlet -->
<servlet>
 <servlet-name>CXFServlet</servlet-name>
 <servlet-class>org.apache.cxf.transport.servlet.CXFServlet</servlet-class>
</servlet>

<servlet-mapping>
 <servlet-name>CXFServlet</servlet-name>
 <url-pattern>/soap-api/*</url-pattern>
</servlet-mapping>

<servlet-mapping>
 <servlet-name>spring</servlet-name>
 <url-pattern>/*</url-pattern>
</servlet-mapping>
- จะเห็นว่าใช้ org.springframework.boot.legacy.context.web.SpringBootContextLoaderListener ตัวนี้แทนของเดิม
- contextConfigLocation เพื่อไปอ่าน Class ที่ Config ของ  SpringBoot เหมือนกับที่ต้อง config บน start-class ที่ใช้บน maven เพื่อให้มันทำานได้

วิธี Downgrade JPA จาก 2.1 เป็น 2.0 ของ SpringBoot

1. เริ่มจากเอา Config  JPA ออกจาก SpringBoot ก่อนครับ โดยใช้ exclusion org.hibernate
<dependency>
 <groupId>org.springframework.boot</groupId>
 <artifactId>spring-boot-starter-data-jpa</artifactId>
 <exclusions>
  <exclusion>  
   <groupId>org.hibernate</groupId>
  </exclusion>
 </exclusions>
</dependency>
2.ต่อไปก็เพิ่ม JPA 2.0 เข้าไป ถ้าใช้บน Websphere อาจจะต้องเอา javax.persistence ออกด้วยครับ ถ้ายังมี error อยู่
<dependency>
 <groupId>org.hibernate</groupId>
 <artifactId>hibernate-core</artifactId>
 <version>${hibernate.version}</version>
 <scope>compile</scope>
 <exclusions>
  <exclusion>
   <groupId>org.hibernate.javax.persistence</groupId>
   <artifactId>hibernate-jpa-2.0-api</artifactId>
  </exclusion>
 </exclusions>
</dependency>
<dependency>
 <groupId>org.hibernate</groupId>
 <artifactId>hibernate-entitymanager</artifactId>
 <version>${hibernate.version}</version>
 <scope>compile</scope>
 <exclusions>
  <exclusion>
   <groupId>org.hibernate.javax.persistence</groupId>
   <artifactId>hibernate-jpa-2.0-api</artifactId>
  </exclusion>
 </exclusions>
</dependency>
3. ต่อไปต้องเพิ่ม Code การโหลด entityManagerFacorry มาใหม่
 @Bean(name = "entityManagerFactory")
    public LocalContainerEntityManagerFactoryBean getEntityManagerFactory() {
     
     LocalContainerEntityManagerFactoryBean entityManagerFactory = new LocalContainerEntityManagerFactoryBean();
     entityManagerFactory.setDataSource(dataSource);
     entityManagerFactory.setPackagesToScan("xxx.entities");
     entityManagerFactory.setJpaVendorAdapter(getJPAVendor());
     entityManagerFactory.setJpaProperties(getHibernateProperties());
     
     return entityManagerFactory;
    }


    @Bean
    public LocalSessionFactoryBean sessionFactory() throws IOException {
     logger.debug("sessionFactory()");
     
        LocalSessionFactoryBean factoryBean = new LocalSessionFactoryBean();
        factoryBean.setHibernateProperties(getHibernateProperties());
        factoryBean.setDataSource(dataSource);
        factoryBean.setPackagesToScan("xxx.entities");
        
        return factoryBean;
    }


    @Bean
    public PersistenceExceptionTranslationPostProcessor exceptionTranslation() {
        return new PersistenceExceptionTranslationPostProcessor();
    }
    
    
    private JpaVendorAdapter getJPAVendor() {
     
     HibernateJpaVendorAdapter hibernateJpaVendorAdaptor = new HibernateJpaVendorAdapter();
     hibernateJpaVendorAdaptor.setShowSql(true);
     
     return hibernateJpaVendorAdaptor;
    }
    
    
    private Properties getHibernateProperties() {
        Properties properties = new Properties();
        
            // This is to get around a Websphere Bug
        properties.put("hibernate.dialect", Oracle10gDialect.class.getName());
        properties.put("hibernate.show_sql", "true");
        
        logger.debug("properties : {}", properties);
        return properties;
    }

วันอังคารที่ 7 กรกฎาคม พ.ศ. 2558

ทำให้ Spring Boot Reload บน Eclipse

ปกติเราจะรันผ่าน Command line โดยใช้ Maven รัน มาตอนนี้ลองรันผ่าน Eclipse กันบ้าง (ตัวอ่นก็ใช้ได้นะครับ)
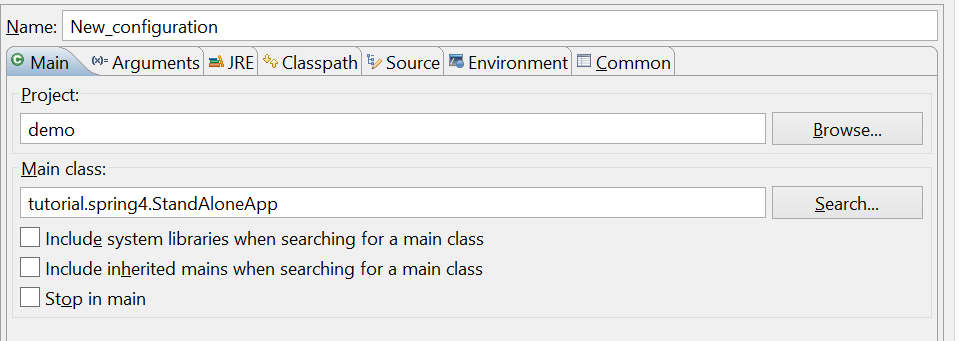
1. จะรันเหมือน Java Class ปกติ ครับ โดยสั่งให้ไปรันที่ Class ที่เราไว้ Start Spring Boot นั่นเอง (Run As..)

2. เผอิญ Eclipseไม่ฉลาดเลยจะไม่เห็นส่วนของ src/main/resources เราจะต้องแอดไปเองในส่วนของ Class Path
3. ต่อไปก็สั่งรันได้แล้วครับ

เพิ่มเติมสำหรับคนอยา่ให้มัน Reladed อัติโนมัตหลังแก้ ให้เพิ่ส่วนของ Spring Loaded ไปตามนี้ครับ
เพิ่มส่วนของ Argument
-javaagent:springloaded-1.2.3.RELEASE.jar -noverify


วันจันทร์ที่ 29 มิถุนายน พ.ศ. 2558

Spring Boot ตอนที่ 9 มาสร้าง Banner กัน

มาสร้าง Banner ลงบน Application ตอนเรา Start กันครับ
มันคือส่วนนี้


เราสามารถเปลี่ยนง่ายโดยการเพิ่ม banner.txt ไว้ที่ src/main/resources ครับ ก็จะได้ใช้ได้เลย
สามารถใช้เวบนี้ สร้างภาพได้ http://patorjk.com/software/taag/#p=display&f=Graffiti&t=Demo%20Spring%20Boot

ส่วนสามารถปิดเปิด Banner ได้โดยการเพิ่มค่าใน application.properties

spring.main.show-banner=true
 

วันเสาร์ที่ 20 มิถุนายน พ.ศ. 2558

Spring Boot ตอนที่ 8 Testing

ต่อไปมาดูว่าเราจะเทสกันยังไงครับ ถ้าเป็น Unit Testing ไม่ใช่ส่วนของ Controller กับ Repository น่าจะเเขียนเทสได้เลยโดยไม่ต้องพึ่ง Spring-Test สกับพวก Integration Testing ก็ต้องใช้ Spring-Test ล่ะครับ
เรามาดูกัน
1. Config POM
 <dependency>  
      <groupId>org.springframework.boot</groupId>  
      <artifactId>spring-boot-starter-test</artifactId>  
      <scope>test</scope>  
 </dependency>  
     โดยมันจะดึง Library Spring Test, JUnit, Hamcrest, Mockito มาให้เลยครับ

2. ถาจะทำเทสจะต้องมี embedded server มาด้วยนะครับ เพราะถ้าเขียนลง Server จะ exclude ออก ถ้าจะเทสจะเอาเข้ามาแล้วใช้ Scope = test เอาครับ แบบนี้
 <dependency>  
      <groupId>org.springframework.boot</groupId>  
      <artifactId>spring-boot-starter-tomcat</artifactId>  
      <scope>provided</scope>  
 </dependency>  

3. มาดู Class Test
 package tutorialspring4.controllers;  
 import static org.hamcrest.Matchers.is;  
 import static org.springframework.test.web.servlet.result.MockMvcResultMatchers.jsonPath;  
 import static org.springframework.test.web.servlet.result.MockMvcResultMatchers.status;  
 import org.junit.Before;  
 import org.junit.Ignore;  
 import org.junit.Test;  
 import org.junit.runner.RunWith;  
 import org.springframework.boot.test.SpringApplicationConfiguration;  
 import org.springframework.http.MediaType;  
 import org.springframework.mock.web.MockServletContext;  
 import org.springframework.test.context.junit4.SpringJUnit4ClassRunner;  
 import org.springframework.test.context.web.WebAppConfiguration;  
 import org.springframework.test.web.servlet.MockMvc;  
 import org.springframework.test.web.servlet.request.MockMvcRequestBuilders;  
 import org.springframework.test.web.servlet.setup.MockMvcBuilders;  
 import tutorial.spring4.controllers.HelloController;  
 import tutorial.spring4.forms.HelloForm;  
 @RunWith(SpringJUnit4ClassRunner.class)  
 @SpringApplicationConfiguration(classes = MockServletContext.class)  
 @WebAppConfiguration  
 public class HelloControllerTest {  
      private MockMvc mvc;  
      @Before  
      public void setUp() throws Exception {  
           mvc = MockMvcBuilders.standaloneSetup(new HelloController()).build();  
      }  
      @Test  
      public void getHello() throws Exception {  
           HelloForm form = new HelloForm();  
           form.setSay("Hi");  
           form.setName("Hello");  
           mvc.perform(MockMvcRequestBuilders.get("/hello").accept(MediaType.APPLICATION_JSON)).andExpect(status().isOk())  
           .andExpect(jsonPath("$.say", is(form.getSay()))).andExpect(jsonPath("$.name", is(form.getName())));  
      }  
 }  
     - RunWith = SpringJUnit4ClassRunner บอก JUnit ว่าจะใช้ Spring Test
     - SpringApplicationConfiguration = MockServletContext บอก Spring ว่าจะใช้ Mock ส่วนของ servlet
     - MockMvc จะ Mock ส่วนของ Controller เพื่อเทส จะเห็นว่าตอน SetUp จะมีการ Build อยู่
     - ส่วนเทสจะเห็นว่าเทสไปที่ Path เลยไม่ได้เทส จาก Controller ทำให้เทส route ว่าถูกไหม ทำงานโอเคไหมครับ

References
Basic
1. Spring Boot ตอนที่ 1 มาทำความรู้จักกับ Spring Boot
2. Spring Boot ตอนที่ 2 Hello World
3. Spring Boot ตอนที่ 3 โครงสร้างของ Project
4. Spring Boot ตอนที่ 4 Spring Boot กับ Thymeleaf
5.Spring Boot ตอนที่ 5 Spring Boot กับ Database [แบบ Embeded]
6.Spring Boot ตอนที่ 6 กับ Production Database
7.Spring Boot ตอนที่ 7 Security
8.Spring Boot ตอนที่ 8 Testing

วันศุกร์ที่ 19 มิถุนายน พ.ศ. 2558

Spring Boot ตอนที่ 7 Security

Spring Boot ก็ใช้ Spring Security ครับ ซึ่งก็ทำง่ายมาก แต่หันมาใช้การ Config ผ่าน Annotation และก็เขียนคลาสหมดไม่ได้ใช้ XML แล้วครับ ซึ่งอาจจะดูแปลกตาสำหรับคนที่ใช้ XML พอสมควร งั้นมาเริ่มกันเลย
1. Config POM เพิ่ม
 <dependency>  
         <groupId>org.springframework.boot</groupId>  
         <artifactId>spring-boot-starter-security</artifactId>  
</dependency>  

2. ต่อไปก็ EnableWebSecurity
 package tutorial.spring4;  
 import javax.annotation.Resource;  
 import org.springframework.beans.factory.annotation.Autowired;  
 import org.springframework.context.annotation.Configuration;  
 import org.springframework.security.authentication.encoding.PlaintextPasswordEncoder;  
 import org.springframework.security.config.annotation.authentication.builders.AuthenticationManagerBuilder;  
 import org.springframework.security.config.annotation.web.builders.HttpSecurity;  
 import org.springframework.security.config.annotation.web.configuration.WebSecurityConfigurerAdapter;  
 import org.springframework.security.config.annotation.web.servlet.configuration.EnableWebMvcSecurity;  
 import org.springframework.security.core.userdetails.UserDetailsService;  
 import org.springframework.security.crypto.bcrypt.BCryptPasswordEncoder;  
 import org.springframework.security.crypto.password.NoOpPasswordEncoder; 
 
 @Configuration  
 @EnableWebMvcSecurity  
 public class WebSecurityConfig extends WebSecurityConfigurerAdapter {  
      @Resource(name="basicUserDetailService")  
      private UserDetailsService userDetailsService;  
      @Override  
      protected void configure(HttpSecurity http) throws Exception {  
           http.authorizeRequests().antMatchers("/hello").permitAll().anyRequest().authenticated().and()  
                     .formLogin().loginPage("/login").failureUrl("/login?error").defaultSuccessUrl("/loginresult", true).permitAll()  
                     .and().logout().permitAll();  
      }  
      @Override  
      protected void configure(AuthenticationManagerBuilder auth) throws Exception {  
           auth.userDetailsService(userDetailsService).passwordEncoder(new PlaintextPasswordEncoder());  
      }  
 }  
     แบบนี้เป็น Config ให้ใช้ UserDetailService ที่คุ้นเคย โดยเราจะเห็นว่า Class นี้เป็น Config และบอกให้ Enable Web Security ด้วย และ extends WebSecurityConfigurerAdapter มีสองตัวหลักๆ
     - Method แรก สำหรับที่เรา Config Route ที่เคยเห็นๆ บน XML อันนี้ยกมาบน Class สำหรับผ่านง่ายขึ้น อธิบายคร่าวๆ
          - antmatches คือตรงกับอันนี้ จะทำอะไรอ่านข้างหลัง permitAll คือเข้าได้หมด อันอื่นๆ anyRequest ต้องมี Authen พอทำเสร็จ
          - ส่วนของหน้า Login ใช้ formLogin ด้วยหน้าอะไร ถ้า fail ไปไหน สามารถกำหนดได้ว่า ถ้า login ให้กลับไปหน้าเก่าที่เราเข้ามาได้ด้วยนะครับ
     - Method ที่สอง หลักๆ ไว้สำหรับเรื่องว่าจะ authen แบบไหนมี่ทั้ง JDBC/LDAP/ InMemory

3. แค่นี้ก็เป็นอันเสร็จเรียบร้อยแล้วครับ

References
Basic
1. Spring Boot ตอนที่ 1 มาทำความรู้จักกับ Spring Boot
2. Spring Boot ตอนที่ 2 Hello World
3. Spring Boot ตอนที่ 3 โครงสร้างของ Project
4. Spring Boot ตอนที่ 4 Spring Boot กับ Thymeleaf
5.Spring Boot ตอนที่ 5 Spring Boot กับ Database [แบบ Embeded]
6.Spring Boot ตอนที่ 6 กับ Production Database
7.Spring Boot ตอนที่ 7 Security
8.Spring Boot ตอนที่ 8 Testing

วันพุธที่ 17 มิถุนายน พ.ศ. 2558

Spring Boot ตอนที่ 6 กับ Production Database

มาต่อกันที่ถ้าเราจะใช้ Database ที่เป็น External กันบ้างจะทำยังไงครับ
1. Config POM เหมือนกับ อันที่แล้ว เลย
 <dependency>  
      <groupId>org.springframework.boot</groupId>  
      <artifactId>spring-boot-starter-data-jpa</artifactId>  
 </dependency>  

2. เพิ่ม Library สำหรับ Connect Database ที่ต้องการ

3. ต่อไป Config เพิ่มใน application.properties ต่อไปเป็นตัวอย่างที่ใช้ประจำครับ มีเพิ่มเติมสามารถไปดูได้ที่ Spring Boot Reference ครับ
 spring.datasource.url=jdbc:mysql://localhost/springboot  
 spring.datasource.username=root  
 spring.datasource.password=password1  
 spring.datasource.driver-class-name=com.mysql.jdbc.Driver  
 spring.jpa.hibernate.ddl-auto=update  
 spring.jpa.open-in-view=true  
 spring.jpa.show-sql=true  
 spring.datasource.initialize=true
     - spring.datasource.url = URL ติดต่อ Database
     - spring.datasource.username = Username ติดต่อ Database
     - spring.datasource.password = Password ติดต่อ Database
     - spring.datasource.driver-class = Driver ต่อต่อ Database
     - ถ้าจะติดต่อผ่าน JNDI ให้ใช้ spring.datasource.jndi-name
     - spring.jpa.hibernate.ddl.auto =  กำหนดว่าจะสร้าง ลบ หรืออัพเดทก่อนไหม
     - spring.jpa.open-in-view = สำหรับให้สามารถดึงข้อมูลตอนอยู่บนหน้าจอได้ มันคือ SessionInView
     - spring.jpa.show-sql = จะให้เห็น SQL ไหม
     - spring.datasource.initialize ให้อ่านค่า data.sql

4. ตอนนี้ Spring Boot รู้ล่ะว่าใช้งาน Spring Data JPA
5. สร้าง Entity ขึ้นมาเพื่อลองใช้งาน

 package tutorial.spring4.entities;  
 import java.io.Serializable;  
 import javax.persistence.Column;  
 import javax.persistence.Entity;  
 import javax.persistence.Id;  
 import javax.persistence.Table;  
 @Entity  
 @Table(name = "AUTHOR")  
 public class Author implements Serializable {  
      @Id  
      @Column(name = "AUTHOR_CODE")  
      private String authorCode;  
      @Column(name = "FIRST_NAME")  
      private String firstname;  
      @Column(name = "LAST_NAME")  
      private String lastname;  
      public String getFirstname() {  
           return firstname;  
      }  
      public void setFirstname(String firstname) {  
           this.firstname = firstname;  
      }  
      public String getLastname() {  
           return lastname;  
      }  
      public void setLastname(String lastname) {  
           this.lastname = lastname;  
      }  
      public String getAuthorCode() {  
           return authorCode;  
      }  
      public void setAuthorCode(String authorCode) {  
           this.authorCode = authorCode;  
      }  
 }  

6. ลอง start ดูครับ จะเห็นว่ามีการสร้าง Table นี้ขึ้นมาให้เลย

7. ต่อไปสร้าง @Repository
 package tutorial.spring4.repositories;  
 import org.springframework.data.jpa.repository.JpaRepository;  
 import tutorial.spring4.entities.Author;  
 public interface AuthorRepository extends JpaRepository<Author, String> {  
 }  

8. สามารถใช้งานได้แล้ว ส่วนการใช้งาน Spring Data JPA เดี๋ยว ผมเพิ่มให้แยกส่วนนะครับ เพราะตรงส่วนนั้นก็เยอะเหมือนกัน

PS. ถ้าอยากให้มีการ Initialize ค่า สามารถใช้ data.sql สร้าง SQL Insert ก่อนได้ครับ โดยไว้ที่ src/main/resources ครับ

References
Basic
1. Spring Boot ตอนที่ 1 มาทำความรู้จักกับ Spring Boot
2. Spring Boot ตอนที่ 2 Hello World
3. Spring Boot ตอนที่ 3 โครงสร้างของ Project
4. Spring Boot ตอนที่ 4 Spring Boot กับ Thymeleaf
5.Spring Boot ตอนที่ 5 Spring Boot กับ Database [แบบ Embeded]
6.Spring Boot ตอนที่ 6 กับ Production Database
7.Spring Boot ตอนที่ 7 Security
8.Spring Boot ตอนที่ 8 Testing

วันพุธที่ 10 มิถุนายน พ.ศ. 2558

Spring Boot ตอนที่ 5 Spring Boot กับ Database [แบบ Embeded]

     โดยปกติเวลาเราใช้ Spring เราก็จะใช้ hibernate ใช่ไหมครับในการติดต่อฐานข้อมูล ซึ่ง Spring Boot ก็มีมาให้โดยใช้ Spring Data JPA ในการติดต่อฐานข้อมูล
     ข้อดีของมันคืออะไร คือเราสามารถเขียนเป็นภาษาคนในการดึงข้อมูลได้เลย และตัวมัน provide iinterface หลายๆ อย่างให้พอสมควร
     ตัวอย่างการดึงข้อมูล findByFirstnameOrderByCreateDateDesc หมายถึงดึงข้อมูลจาก Column Name = firstname โดยดึงมาแล้วเรียงด้วย CreateDate แบบ Desc
     ต่อไปส่วนของ Spring Boot ได้เตรียมการติดต่อฐานข้อมูลแบบ Embedded Database ไว้แค่เราบอกว่าใช้ โดยมี H2, HSQL, Derby
     เรามาดูส่วนของการใช้งาน Embeded กันก่อนนะครับ ซึ่งถ้าจะใช้ External Database ก็แค่เพิ่ม config ใน application.properties เท่านั้น

1. เพิ่มข้อมูลใน pom.xml ว่าจะใช้ Spring-data-jpa กับจะใช้ Database อะไร
 <dependency>  
   <groupId>org.springframework.boot</groupId>  
   <artifactId>spring-boot-starter-data-jpa</artifactId>  
 </dependency>  
 <dependency>  
   <groupId>org.hsqldb</groupId>  
   <artifactId>hsqldb</artifactId>  
   <scope>runtime</scope>  
 </dependency>  
     - dependency อันแรกหมายถึงจะใช้ spring-data-jpa
     - dependency อันที่สองหมายถึงจะใช้กับ Hsql นะ

2. เรามาลองสร้าง Entity สร้างปกติเลยครับ
 package tutorial.spring4.entities;  
 import java.io.Serializable;  
 import javax.persistence.Column;  
 import javax.persistence.Entity;  
 import javax.persistence.Id;  
 import javax.persistence.Table;  
 @Entity  
 @Table(name = "AUTHOR")  
 public class Author implements Serializable {  
      @Id  
      @Column(name = "AUTHOR_CODE")  
      private String authorCode;  
      @Column(name = "FIRST_NAME")  
      private String firstname;  
      @Column(name = "LAST_NAME")  
      private String lastname;  
      public String getFirstname() {  
           return firstname;  
      }  
      public void setFirstname(String firstname) {  
           this.firstname = firstname;  
      }  
      public String getLastname() {  
           return lastname;  
      }  
      public void setLastname(String lastname) {  
           this.lastname = lastname;  
      }  
      public String getAuthorCode() {  
           return authorCode;  
      }  
      public void setAuthorCode(String authorCode) {  
           this.authorCode = authorCode;  
      }  
 }  

3. ถ้าจะใส่ค่าเริ่มต้นลงในฐานข้อมูลก็ใช้ data.sql ไว้ที่ src/main/resources ครับ เป็น sql Insert ข้อมูลลงฐานข้อมูลให้

4. สร้าง Repository ไว้ process กับฐานข้อมูล
 package tutorial.spring4.repositories;  
 import org.springframework.data.jpa.repository.JpaRepository;  
 import org.springframework.data.jpa.repository.support.JpaEntityInformation;  
 import tutorial.spring4.entities.Author;  
 public interface AuthorReporsitory extends JpaRepository<Author, String>{  
 }  

5. ตอนนี้ก็เรียกใช้งานได้แล้วครับ

References
Basic
1. Spring Boot ตอนที่ 1 มาทำความรู้จักกับ Spring Boot
2. Spring Boot ตอนที่ 2 Hello World
3. Spring Boot ตอนที่ 3 โครงสร้างของ Project
4. Spring Boot ตอนที่ 4 Spring Boot กับ Thymeleaf
5.Spring Boot ตอนที่ 5 Spring Boot กับ Database [แบบ Embeded]
6.Spring Boot ตอนที่ 6 กับ Production Database
7.Spring Boot ตอนที่ 7 Security
8.Spring Boot ตอนที่ 8 Testing


วันจันทร์ที่ 8 มิถุนายน พ.ศ. 2558

Spring Boot ตอนที่ 4 Spring Boot กับ Thymeleaf

     เรามาพูดกันที่ส่วนของการทำ Web Framework กันครับ ซึ่ง Spring Boot มีให้เลือกใช้หลายตัวพวก Template Engine ทั้งหลาย Free Maker, Groovy, Velocity, Thymeleaf
     แล้วทำไมผมถึงเลือกใช้ Thymeleaf ล่ะ เพราะมันคือการเพิ่ม tag พิเศษของ Thymeleaf เองเข้าไปใน HTML Page เลยทำให้สามารถทำหน้า Mock Up นั้นมาใส่ข้อมูลเพิ่มได้เลย ถ้าไม่รันผ่าน Thymeleaf ก็จะเห็นเป็น HTML ธรรมดาแต่พอผ่าน Thymeleaf ก็จะเห็นที่เราใช้ขึ้นมา เราเพิ่มเพียงแค่ th:xxx ใน html tag เท่านั้น
     เรามาดูการ Config กันครับ
1. Config ให้ Spring Boot รู้จัก Thymeleaf โดยเพิ่ม spring-boot-starter-thymeleaf มาใน pom.xml
 <dependency>  
                <groupId>org.springframework.boot</groupId>  
                <artifactId>spring-boot-starter-thymeleaf</artifactId>  
           </dependency>  

2. ใช้งานได้แล้ว ต่อไปเรามาทำส่วนของ Controller กันต่อ
 package tutorial.spring4.controllers;  
 import org.slf4j.Logger;  
 import org.slf4j.LoggerFactory;  
 import org.springframework.stereotype.Controller;  
 import org.springframework.ui.Model;  
 import org.springframework.web.bind.annotation.RequestMapping;  
 import org.springframework.web.bind.annotation.RequestMethod;  
 import tutorial.spring4.forms.HelloForm;  
 @Controller  
 @RequestMapping(value="/thymeleaf")  
 public class ThymeleafController {  
      private final static Logger LOG = LoggerFactory.getLogger(ThymeleafController.class);  
      @RequestMapping(method=RequestMethod.GET)  
      public String getPage(final Model model) {  
           LOG.debug("getPage(final Model model)");  
           HelloForm form = new HelloForm();  
           form.setSay("Hi");  
           form.setName("Thymeleaf");  
           model.addAttribute("thymeleaf", form);  
           return "thymeleaf";  
      }  
 }  
     จะเห็นว่าเขียนเหมือน Spring Controller ปกติเลย โดยตอน return จะถูก Mapping ด้วย /src/main/resources/templates/thymeleaf.html จะเติมให้โดยอัติโนมัติโดยไม่ต้อง Config เพิ่มเติมอะไร
     ส่วน model.addAtribute("thymeleaf", form) เราจะเอาไปใช้กับหน้าจอโดยเรียก thymeleaf

3. ต่อไปในส่วนของหน้าเวบ เราจะสร้าง thymeleaf.html โดยไปไว้ที่ src/main/resources/templates
 <!DOCTYPE html>  
 <html xmlns="http://www.w3.org/1999/xhtml"  
    xmlns:th="http://www.thymeleaf.org"  
    th:include="template :: page">  
   <head>  
     <title>Hello World Spring Boot</title>  
           <!-- initialize the pickers -->  
   </head>  
   <body>  
        <div class="starter-template" th:fragment="content">  
                 <form class="form-inline" role="form" th:object="${thymeleaf}">  
                 <div class="form-group">  
                  <label>Say : </label>  
                  <input type="text" id="hello" th:field="*{say}"/>  
                 </div>  
                 <div class="form-group">  
                  <label>Name : </label>  
                  <input type="text" id="hello" th:field="*{name}"/>  
                 </div>  
                 <button type="submit" class="btn btn-default">Submit</button>  
                </form>  
        </div>  
   </body>  
 </html>  
     - th:include คือการทำส่วนของ template โดยดึง template.html มาในส่วนของ page
     - th:fragment คือส่วนที่เราจะบอกว่าส่วนนี้ให้เอาหน้านี้มาใช้แสดงใน template
     - th:object เป็นการ Mapping Object กับ Form ของหน้าจอ
     - th:field จะ Mapping กับ field ของ thymeleaf ที่เป็น Object ของ HelloForm เช่น th:field="*{say}" จะถูก Mapping กับ field name = "say"

4. แค่นี้เราก็ใช้งานได้แล้วครับ โดยเรียกจาก /thymeleaf ที่ถูก Mapping ใน Controller

References
Basic
1. Spring Boot ตอนที่ 1 มาทำความรู้จักกับ Spring Boot
2. Spring Boot ตอนที่ 2 Hello World
3. Spring Boot ตอนที่ 3 โครงสร้างของ Project
4. Spring Boot ตอนที่ 4 Spring Boot กับ Thymeleaf
5.Spring Boot ตอนที่ 5 Spring Boot กับ Database [แบบ Embeded]
6.Spring Boot ตอนที่ 6 กับ Production Database
7.Spring Boot ตอนที่ 7 Security
8.Spring Boot ตอนที่ 8 Testing

วันอาทิตย์ที่ 7 มิถุนายน พ.ศ. 2558

Spring Boot ตอนที่ 3 โครงสร้างของ Project

หลังจากได้ Hello World มาแล้ว เรามาดูโครงสร้างของ Project ที่สร้างด้วย Spring Boot กันว่าเราจะเอาอะไรไว้ที่ไหนอย่างไรบ้าง ถ้าเราทำเป็น Default ไว้
หน้าตาจะประมาณนี้ครับ
     - src/test/java ส่วนของการเขียนเทส
     - src/main/java ส่วนของ Code Java ทั้งหมด แต่มีข้อแม้ว่า class ที่จะมี annotation ทั้งหมดจะต้องอยู่ตั้งแต่ tutorial.spring4 ไปครับ ไม่งั้นจะไม่อ่าน annotation มาให้
     - src/main/resources ส่วนของ properties/ config ต่างๆ ครับ
          - templates ส่วนของไฟล์หน้าจอที่ไม่ต้องการเป็น static
          - static ส่วนของหน้าจอที่อยากให้เป็น static ครับ เรียกไฟล์ก็จะมาหาที่นี่เลย
          - application.properties ส่วนของ Config ต่างๆ ของ Spring Boot ถ้าไม่พใจอะไรมา Config ให้ต่างจากค่า Default ได้ครับ และส่วนของ database ด้วย

References
Basic
1. Spring Boot ตอนที่ 1 มาทำความรู้จักกับ Spring Boot
2. Spring Boot ตอนที่ 2 Hello World
3. Spring Boot ตอนที่ 3 โครงสร้างของ Project
4. Spring Boot ตอนที่ 4 Spring Boot กับ Thymeleaf
5.Spring Boot ตอนที่ 5 Spring Boot กับ Database [แบบ Embeded]
6.Spring Boot ตอนที่ 6 กับ Production Database
7.Spring Boot ตอนที่ 7 Security
8.Spring Boot ตอนที่ 8 Testing

วันเสาร์ที่ 6 มิถุนายน พ.ศ. 2558

Spring Boot ตอนที่ 2 Hello World

ต่อไปเรามาลองสร้าง Hello World โดยใช้ Spring Boot กันครับ ตัว Spring Boot ใช้ Servlet 3.0 เพราะฉะนั้นจะไม่มี web.xml แล้วนะครับ

1. Config Maven ด้วย
 
<properties>  
   <project.build.sourceEncoding>UTF-8</project.build.sourceEncoding>  
   <java.version>1.7</java.version>  
   <start-class>tutorial.spring4.StandAloneApp</start-class>  
</properties>  

<parent>  
   <groupId>org.springframework.boot</groupId>  
   <artifactId>spring-boot-starter-parent</artifactId>  
   <version>1.2.4.RELEASE</version>  
 </parent>  


 <dependencies>  
   <dependency>  
     <groupId>org.springframework.boot</groupId>  
     <artifactId>spring-boot-starter-web</artifactId>  
   </dependency>  
 </dependencies>  
     - Properties จะเป็นส่วนบอก Spring Boot ว่าทำงานอย่างไร
          - project.build.sourceEncoding บอกว่า source code ใช้ encoding อะไร
          - java.version บอกว่าจะใช้ Java Version อะไร
          - start-class คลาสที่จะให้รัน Initialize ขึ้นมา จาก Config หมายถึงจะวิ่งไปอ่าน StandAlone มาเพื่อรัน Spring ครับ

2.เราก็สร้าง Class StandAlone ใน package tutorial.spring4
 @SpringBootApplication  
 public class StandAloneApp extends SpringBootServletInitializer {  
      public static void main(String[] args) {  
           SpringApplication.run(StandAloneApp.class);  
      }  
 }  


     - @SpringBootApplication คือกรรวมกันของ 3 อย่าง @Configuration, @EnableConfiguration, @ComponentScan
     - extends SpringBootServletInitializer ถ้ารันด้วยตัว SpringBoot เองไม่ต้องใส่ก็ได้ครับ แต่ถ้าไปรันบน Server จะต้องใส่ไว้
     - SpringApplication.run(StandAloneApp.class) สั่งรันทำงาน จาก start-class

3. ต่อไปก็สร้าง Controller สำหรับรันได้เลยครับ โดย Class ทุกอย่างต้องอยู่ระดับที่ต่อจาก StandAloneApp คือหลังจาก tutorial.spring4
 @Controller  
 public class SampleController {  
   @RequestMapping("/")  
   @ResponseBody  
   String home() {  
     return "Hello World!";  
   }  
 }  

4. สั่งร้นได้จากตัว jar ได้เลยครับ โดย
     - mvn package ก่อน
     - java -jar target/xxx.jar รัน app ที่สร้างขึ้นมา

References
Basic
1. Spring Boot ตอนที่ 1 มาทำความรู้จักกับ Spring Boot
2. Spring Boot ตอนที่ 2 Hello World
3. Spring Boot ตอนที่ 3 โครงสร้างของ Project
4. Spring Boot ตอนที่ 4 Spring Boot กับ Thymeleaf
5.Spring Boot ตอนที่ 5 Spring Boot กับ Database [แบบ Embeded]
6.Spring Boot ตอนที่ 6 กับ Production Database
7.Spring Boot ตอนที่ 7 Security
8.Spring Boot ตอนที่ 8 Testing

Spring Boot ตอนที่ 1 มาทำความรู้จักกับ Spring Boot

     Spring Boot ทำให้เราสามารถสร้าง Spring Project ได้ง่ายขึ้นมากๆ และสามารถเพิ่มพวกความสามารถได้ง่ายขึ้นเช่นให้ใช้งาน Thymeleaf, Spring Data JPA, Spring Security เป็นต้น และมี embbeded server ไว้สำหรับรันเทสแบบ standalone ได้เลย
      ถ้าเคยใช้ Spring มาจะรู้ว่าการใช้งานจะมีให้เลือกใช้งานได้ตั้งแต่แบบ XML/ Annotation หรือผสมกันไปหมด หาตัวอย่างอาจจะงงเองว่า อ้าวควรใช้แบบไหนล่ะ แบบนี้ใช้ได้ไม่ได้ ตัว Spring Boot เลยแก้พวกนี้หมดเพราะแค่บอกว่าจะใช้ Spring Boot จะจัดการ Config ให้หมดครับ แต่ถ้าใครอยากรู้รายละเอียดก็ควรจะลองเขียนดูครับ หรือแกะโค้ดของ Spring Boot ดูจะช่วยให้เข้าใจมากขึ้น
     ข้อเสียก็โหลดไลบารี่เยอะมาก ครับและต้องมีความรู้ Spring ขั้นต้นก่อนถึงจะใช้งานรู้เรื่อง

     การใช้งานก็แค่ตามข้างล่างนี้ครับ ใช้ maven config pom.xml

 <parent>  
   <groupId>org.springframework.boot</groupId>  
   <artifactId>spring-boot-starter-parent</artifactId>  
   <version>1.2.4.RELEASE</version>  
 </parent>  
 <dependencies>  
   <dependency>  
     <groupId>org.springframework.boot</groupId>  
     <artifactId>spring-boot-starter-web</artifactId>  
   </dependency>  
 </dependencies>  

ตอนหน้าก็สอน Hello World ครับ

References
Basic
1. Spring Boot ตอนที่ 1 มาทำความรู้จักกับ Spring Boot
2. Spring Boot ตอนที่ 2 Hello World
3. Spring Boot ตอนที่ 3 โครงสร้างของ Project
4. Spring Boot ตอนที่ 4 Spring Boot กับ Thymeleaf

วันพุธที่ 30 เมษายน พ.ศ. 2557

Config Maven สำหรับ Websphere

เป็นการ Config Eclipse เพิ่มเติมสำหรับ Add Reference Websphere  ครับ
โดยเพิ่ม ข้อมูลตามนี้ แยกตามแต่ละชนิดของ Application (ในส่วน additionalProjectFacets) แล้วใส่เลขเวอร์ชั่นของ Websphere  ลงไป

 <plugin>  
                     <groupId>org.apache.maven.plugins</groupId>  
                     <artifactId>maven-eclipse-plugin</artifactId>  
                     <version>2.9</version>  
                     <configuration>  
                          <wtpversion>2.0</wtpversion>  
                          <additionalProjectFacets>  
                               <jst.ear>6.0</jst.ear>  
                               <com.ibm.websphere.extended.ear>8.0</com.ibm.websphere.extended.ear>  
                               <com.ibm.websphere.coexistence.ear>8.0</com.ibm.websphere.coexistence.ear>  
                          </additionalProjectFacets>  
                     </configuration>  
                </plugin>  

1. Web Project เพิ่ม
     - com.ibm.websphere.extended.web
     - com.ibm.websphere.coexistence.web
2. EJB Project
     - com.ibm.websphere.extended.ejb
3. Enterprise Project
     - com.ibm.websphere.extended.ear
     - com.ibm.websphere.coexistence.ear

วันพุธที่ 2 เมษายน พ.ศ. 2557

Config Maven ให้โหลด Source และ API Docs

ปกติสามารถโหลดได้จาก Command Line ได้เลยครับ หรือจะไป Config บน settings.xml

1. แบบที่ทำผ่าน Command Line ให้เพิ่ม

-DdownloadSources=true -DdownloadJavadocs=true  
 
2. แบบที่เพิ่มใน settings.xml (ให้เพิ่มไฟล์นี้ใน Folder .m2)

<profiles>
     <profile> 
          <id>downloadSources</id>
          <properties> 
               <downloadSources>true</downloadSources>
               <downloadJavadocs>true</downloadJavadocs>
          </properties> 
     </profile> 
</profiles> 
<activeProfiles> 
     <activeProfile>downloadSources</activeProfile> 
</activeProfiles> 


Reference
http://stackoverflow.com/questions/5780758/maven-always-download-sources-and-javadocs

วันพุธที่ 26 มีนาคม พ.ศ. 2557

Config JBoss 7.1 ให้ใช้งาน JPA 2.1

JBoss 7.1 จะใช้ JPA 2.0 ครับ ผมเลยอัพเดท Library ของ Server ให้เป็น JPA 2.1 โดยทำดังนี้
1. ไปที่ Folder {JBOSS_HOME}\modules\javax\persistence\api\main จะเห็นไฟล์ hibernate-jpa-2.0-api-1.0.1.Final.jar อยู่ให้ทำการ copy hibernate-jpa-2.1-api-1.0.0.Final.jar มาวางไว้ที่นี่ (Library JPA 2.1)
2. แก้ไขไฟล์ module.xml  ในส่วน resource-root แก้ส่วนของ Path ให้เป็น hibernate-jpa-2.1-api-1.0.0.Final.jar
3. Stop/ Start Server ก็จะใช้งานได้แล้วครับ

ปล.
ผมใช้ Spring แล้วมีปัญหาอาจจะต้องอัพเดท File javassist-3.15.0-GA.jar ไปเป็น javassist-3.18.1-GA.jar แล้วแก้ module.xml เพื่อโหลด Library ตัวใหม่ โดยจะอยู่ที่ Path {JBOSS_HOME}\modules\org\javassist\main

วันพฤหัสบดีที่ 19 กันยายน พ.ศ. 2556

Config slf4j ให้ใช้งานบน JBoss 7

ปกติ ถ้าเรา Config Log4j บน slf4j แล้วจะใช้งานไม่ได้เพราะไม่มีการอ่าน Config จาก Application ครับ
เลยต้อง Config เพิ่มโดย

1. สร้างไฟล์ jboss-deployment-structure.xml
2. Config บอกให้ exclude package เหล่านี้ ตามข้างล่าง

 <?xml version="1.0" encoding="UTF-8"?>  
 <jboss-deployment-structure>  
  <deployment>  
   <exclusions>  
     <module name="org.apache.log4j" />  
     <module name="org.slf4j" />  
     <module name="org.slf4j.impl" />  
   </exclusions>  
  </deployment>  
 </jboss-deployment-structure>  

วันพฤหัสบดีที่ 12 กันยายน พ.ศ. 2556

Config Datasource บน JBoss AS7

เราจะต้อง Config JDBC Library ให้มีบน Library ก่อน แล้วถึงจะ Config Datasource อีกทีนึงครับ ผมจะยกตัวอย่างของ Oracle

1. Config JDBC Library ก่อน โดย Config ไว้ที่
  • {JBOSS_HOME}\modules\ แล้วสร้าง Path ของ Library ไว้เช่น com\oracle\ojdbc6\main
  • สร้างไฟล์ module.xml แล้วเอา Jar File มาวางไว้ โดยใน Module.xml ส่วนสี่แดงต้องแก้ไข
    • name คือชื่อส่วน folder path ที่สร้างไว้
    • resource-root คือชื่ือ Jar File ที่เราเอามาวางไว้
 <?xml version="1.0" encoding="UTF-8"?>  
 <module xmlns="urn:jboss:module:1.0" name="com.oracle.ojdbc6">  
  <resources>  
   <resource-root path="ojdbc6.jar"/>  
  </resources>  
  <dependencies>  
           <module name="javax.api" />  
     <module name="javax.transaction.api"/>  
     <module name="javax.servlet.api" optional="true"/>  
  </dependencies>  
 </module>  

2. Config Datasource

  • แก้ไข {JBOSS_HOME}\standalone\configuration\standalone.xml แล้วเพิ่มในส่วนของ Datasource และ Drivers
    • ส่วนสีแดงต้องแก้ไขให้ถูกต้องตามที่ Config ไว้
    • ส่วนสีหน้ำเงินจะต้องตรงกันเพราะ driver จะไป references กับ config driver ข้างล่างที่ตรงสีฟ้าครับ
         <datasource jndi-name="java:jboss/datasources/SampleJPADS" pool-name="SampleJPADS" enabled="true" use-java-context="true">  
           <connection-url>jdbc:oracle:thin:@localhost:1521/TEST</connection-url>  
           <driver>oracle</driver>  
           <security>  
             <user-name>test</user-name>  
             <password>test1234</password>  
           </security>  
         </datasource>  

 <driver name="oracle" module="com.oracle.ojdbc6">  
             <xa-datasource-class>oracle.jdbc.driver.OracleDriver</xa-datasource-class>  
           </driver>  
         </drivers>  

3. แล้วทำการ Restart Server ก็จะใช้งาน Datasource ได้แล้วครับ โดยเรียกจาก jndi-name จากตัวอย่าง java:jboss/datasources/SampleJPADS

4. เราสามารถดู Log Start Server ได้ว่าใช้งานได้รึยัง ตามนี้ ครับ
[org.jboss.as.connector.subsystems.datasources] (MSC service thread 1-2) JBAS010400: Bound data source [java:jboss/datasources/SampleJPADS]

วันจันทร์ที่ 5 มีนาคม พ.ศ. 2555

ปัญหาการใช้ @Transactional แล้วได้ exception Error: No Hibernate Session bound to thread

เป็นปัญหาที่เราใช้ Spring กับ Hibernate แล้วดึง getCurrentSession มาใช้ แล้วจะขึ้น Exception ประมาณนี้

org.hibernate.HibernateException: No Session found for current thread

ซึ่งเกิดจากการที่เราไม่มี Transaction ไปครอบไว้ แก้โดย
1. เพิ่ม @Transactional
2. เพิ่ม <tx:annotation-driven />
3. เพิ่ม component scan ในส่วนที่ไว้ tx:annotation-driven ต้องเป็นส่วนใน applicatoncontext.xml ครับ
4. ถ้าเราใส่ component scan บน dispatch-servlet.xml แล้ว จะยังไม่ได้ ต้องทำการเพิ่มให้ส่วน dispatch-servlet.xml เอาเฉพาะ controller ส่วน business service, dao service ให้เอาไปวางไว้ที่ applicationtext.xml แทน ก็จะได้ครับ

Reference
http://www.sivalabs.in/2011/05/springmvc-hibernate-error-no-hibernate.html

วันอังคารที่ 28 กุมภาพันธ์ พ.ศ. 2555